
SpecterPoint
See the repo here, SpecterPoint
I’d imagine if you’re clicking on this post you’re wondering what is SpecterPoint - well I’ll tell you. Welcome to my interpretation and development of a C2 server. Accompanied by a client, server, and agent, where I try to write as much in Rust as possible. Currently the only thing not written in rust is part of the client, as it’s using typescript for UI components. Before advancing to the next section, please understand there is a lot of information to cover. I apologize if my ideas are a little all over the place. I am trying my best to not only provide an easy to read experience, but get enough technological information crammed in as possible.
What is a C2 server?
A C2, or also known as a Command and Control server, is a tool used in the vast arsenal of a threat actor. Actors will use C2 servers to communicate with infected hosts to, establish persistence, gather intel, deploy malware, or become a zombie as part of a botnet. Command and Control infrastructure is really neat, as it allows for an unorthodox method of controlling a host outside of the norms of something like RDP or SSH. Ideally this activity is well hidden making it difficult to detect. Check out these articles if you want to learn more about C2s.
https://www.sentinelone.com/cybersecurity-101/threat-intelligence/what-are-command-control-c2-servers/ https://www.malwarepatrol.net/command-control-servers-c2-servers-fundamentals/
Why a new C2, am I worried about who will use it?
What better way to learn how to understand and fight against a C2 than to create one. Lately I’ve been in this mode of writing malicious things to better understand it. Write code, reverse it, identify how it works, build against it. C2 servers have always been a little bit of mystery to me because I’ve seen a fair share of poorly implemented ones. Now I am not saying mine is well implemented, I plan to constantly add features to it when and if I can, but I’m starting small.
Which leads me to my next thing - am I worried about the possibility of threat actors using it? Well of course, but my code is no different than the existing other repos out there on git already. However, I would like to take this time to mention that this C2 is for purely educational and ethical purposes only.
The First Design Idea
So as I was planning to build this, I had an original design idea in mind. Build something capable of hosting multiple endpoints and listeners, while also supporting the deployment of several servers that would feed information back to the client.
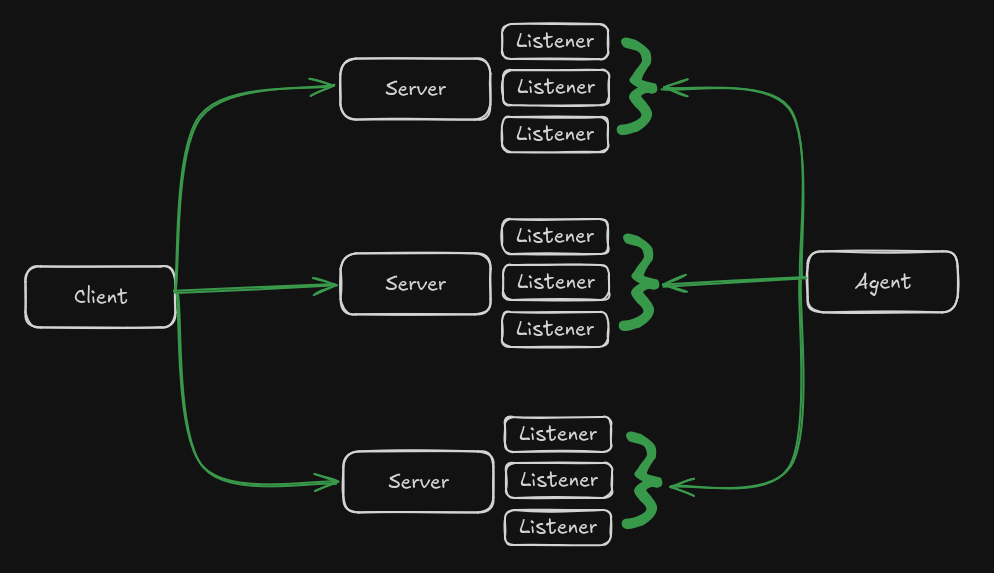
Not too shabby right? Relatively simple design, maybe a little on the over engineered side, but I do love building highly availability and redundant applications, and with good reason which we will talk about later on. From what we can see of this first design, we have a single client capable of communicating with the server, ideally this will be to add new listeners and send tasks to agents. We also have agents that will also communicate with the servers to send task results and any other information we want.
Getting Started with Technologies and Frameworks
With every new project, I always find the hardest part is getting started, and this project was no different. So I thought to myself, what should I do first to really get myself going. Easy! I’ll do the thing I enjoy the least - making things pretty. With the idea that I really wanted to keep rust for all aspects of the tool, I decided to leverage Tauri.
Why Tauri and not Dioxus - well, Dioxus would have given me the opportunity to write more rust and both frameworks use a web view to render the UI. But if I’m being honest, I really wanted to upgrade my web development skills and using Tauri offered that. Tauri allowed me to write a lot of my client side code in TypeScript while still offering a rust backend. Thanks to this, I got to experience and play with some libraries like Tanstack Router, TanStack Form, Shadcn, and Tailwind CSS. But I wouldn’t be surprised if I decide to swap over to Dioxus at some point just to learn and experiment with the library.
In addition to the UI, I had to think of a way of how I wanted to store my data for the client and server. Both the client and the server would require holding on to important information such as listener configurations, users, passwords, etc. And I didn’t want to leverage something too heavy and unecessary like postgres, so I settled with SQLite. SQLite was a no brainer due to it’s lightweight design and especially since it works so well with Rust leveraging the SQLx library. If you enjoy a non-orm based library, I highly recommend SQLx.
Let’s talk a little about the server design… finally, an area I am more familiar with, leading me to easily making the decision to utilize Axum. I can’t say I’m an expert with Axum, and this is yet another perfect excuse to go more indepth with it.
The main goal of the server is to act as an API endpoint, but also as a proxy for any communcations back and forth with the agents. Why distinctly mentioned the difference? Well, our API will handle things like creation of new listeners and endpoints, starting and stopping listeners as our client pleases, and allow multiple users to connect and manage the servers. The proxy piece comes naturally as we build out our server, it is the middle man in terms of communication between the agent and the client. As we add new tasks from the client, we will expect a result of those tasks to be sent back to the client and possibly leak our information. Of course, we wouldn’t want to have some bad OPSEC by sending results from the agent back directly to the client, best way to do so is leveraging the server for those communications between agent and client. If we are really concerned with the OPSEC from even our client to our servers, we could use things like VPNs, proxies, hosting the client on some environment we aren’t directly associated with etc.
That was quite the mouth full of words to get some minor details out of the way. Since I have not quite figured out my design in terms of the agent - yet. I will move past this for now and apologize, If you are reading this, come back soon and hopefully I will have the agent design up. For now enjoy the rest of the write up!
UI Design
For the client I wanted to encompass the feel of familiarity, playfulness, but at the same time, some cool dark theme that worked with a logo. Now I must admit, the ghost logo that you’ll see in specterpoint was ripped off the web, I did not make it, but I find it very fitting. Feel free to skip this part if it’s of no interest to you, but let me explain some of the main components of the UI and how I have things laid out.
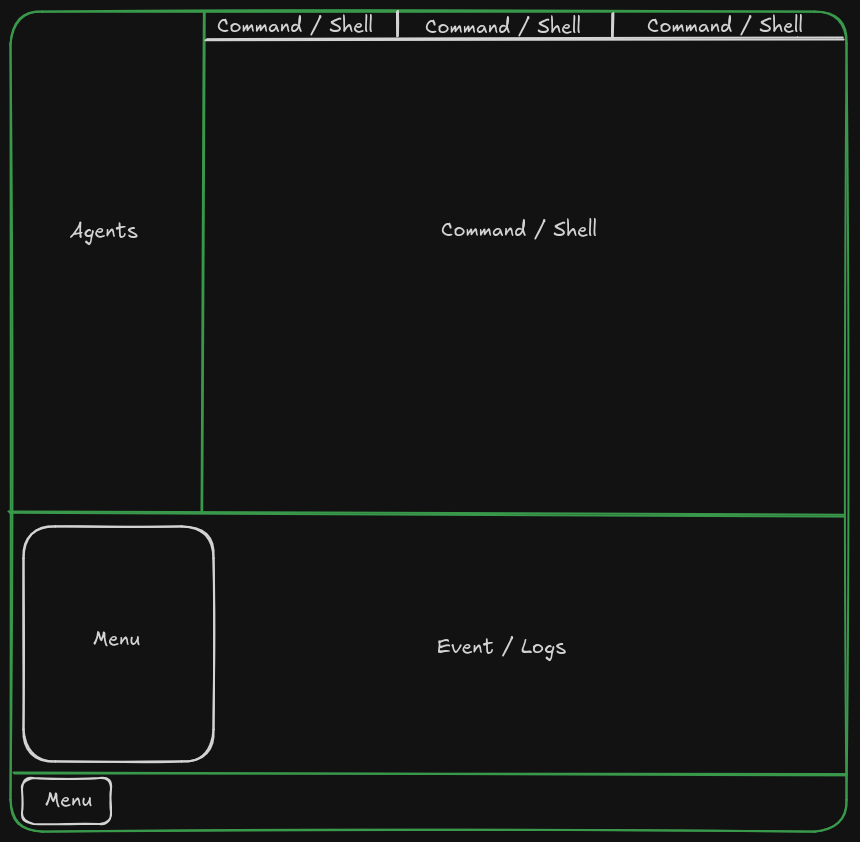
Agents
This section of the UI will be home to all agents that connect. It will be dynamically populated while the client is open. Each agent will appear with an ID along with a last seen date to keep the user informed.
Command / Shell
Each agent that is interacted with will have the option to select a command like terminal or a reverse shell. The Command based terminal will provide users with simple commands that can be issued out to each agent, things like download a file, upload file, etc. The reverse shell will be capable of achieving a full shell on the desired system, much like how you would obtain when using SSH to connect to a host.
Event / Logs
I’m very proud of this section as it provides a real time look into logs from the servers or any events occuring from the agents. The event and logs component consists of a TCP stream of events and is refreshed as new events hit the socket on the backend. I’ll share more details into how this works later in the blog.
Menu
Last but not least, the menu. Arguably one of the most simple, yet most important components. This menu was designed to open similar to the Windows start menu or XFCE application launcher if you’re more familiar with Linux. The menu consists of navigational properties in order to switch through the various - pages - that the application provides for configuring.
If you’re looking for a more in depth and detailed overview of the UI and how it is used. Please see the Wiki associated with the GitHub repo.
Before Going Further
Just so some things don’t get lost along the way, I’m going to take this time to discuss a few things that I have implemented that hopefully will stick in your mind as we venture further into the development of the overall tool.
Encryption & Hashing
SQLite does not natively support encryption - things like passwords, server connection information, etc. Is stored in clear, in order to circumvent this it was crucial to create a common library shared between all components of the tool to provide the capabilities of AES GCM 256 encryption. In additional to AES, you will find that the common library will also contain Argon2 for hashing in order to authenticate against a username password.
Moving past the data at rest, this tool produces private key pairs for each new listener. This is used for both agent and server communications. Looking through the code you will find middleware attached to the HTTP listeners that uses an associated RSA private key to decrypt data stored in the Bearer token of the agent communications to the server, more on this to follow.
Why so Redundant and Highly Available?
The idea behind redundancy and availability is to provide the agents with several locations to check in, produce events or logs, and retrieve tasks. It would be a shame if our one and only server was blocked by the network rending our C2 useless. Having rotational capabilities such as round robin, least connections, and many more, will give us the best chance at our activity reaching back to the client.
Providing multiple servers also gives users the opportunity to build the environment in a way they desire based on network throughput, resource constraints, and any other reason.
Prerequisites
Not Covered
- Individual OS environment
- IDE Setup
Rust
curl --proto '=https' --tlsv1.2 -sSf https://sh.rustup.rs | sh
Node.js & pnpm
Download Node.js the way you want
# installs nvm (Node Version Manager)
curl -o- https://raw.githubusercontent.com/nvm-sh/nvm/v0.40.0/install.sh | bash

# download and install Node.js (you may need to restart the terminal)
nvm install 20 # Change to your preference

# verifies the right Node.js version is in the environment
node -v

# verifies the right npm version is in the environment
npm -v
pnpm
curl -fsSL https://get.pnpm.io/install.sh | sh -
Creating the Workspace
Before creating the Tauri app, we need to properly configure the workspace.
# Create both the Specterpoint directory and client subdirectory
mkdir SpecterPoint && mkdir Specterpoint/client/
cd SpecterPoint
touch Cargo.toml
cargo new server
cargo new agent
cargo new common --lib
cargo new comms --lib
Populate our Cargo.toml with the following
[workspace]
members = ["client/src-tauri", "server", "agent", "common", "comms"]
Tauri
cd Specterpont/client/
pnpm create tauri-app@latest
As you’re building the app, set the name however you’d like, followed by selecting the desired language (TypeScript / JavaScript), package manager (pnpm), followed by your UI template (React). Feel free to experiment with other options and attempt in replicating what was built in a different language or framework.
Frontend Setup
For the frontend as mentioned previously, it was planned to utilize Shadcn and Tailwind CSS.
Firstly we will install Tailwind CSS since it is required by Shadcn.
Tailwind CSS
I recommend their install page as it is well documented.
Shadcn
Since this tool was built with React, we will need to install Shadcn the manual way.
Get to Coding Already
With the prerequisites and some of the setup out of the way, we can finally get to some of the details of the code.
Frontend
Under construction